Diagrams worth reading
The model decides what the picture says. Code decides where things go, and checks the drawing before anyone sees it.
On this page · 9 sections
- Follow one request through the system
- First, tell the agent how to choose the picture
- Then give it a format it can actually write
- Hand that file to Python
- Measure the boxes, then connect them
- A finished drawing gives us something to reject
- How the build chooses another drawing
- Bring the result back to the agent
- What I’d inspect when the next diagram looks wrong
My agent can write Mermaid. The part I want help with now is getting a diagram I can put in front of another engineer without having to explain how to read it.
Say we’re documenting a background report job using RQ, a Python job queue backed by Redis. Something submits the job, a worker runs it, and someone checks the result. Redis holds the waiting job IDs, job records, and retained outcomes.
With that source context available, a request might be:
Draw an architecture diagram showing how an RQ job goes from submission to execution and a result, including the success and failure paths.
Here’s a first-pass view of that flow:
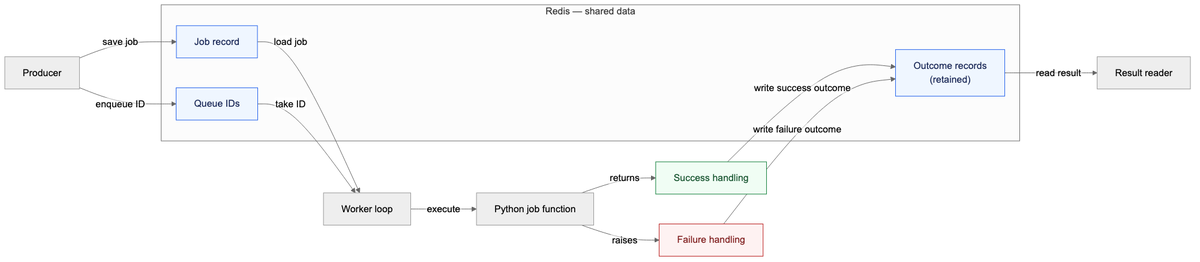
Try following a failed job back into its outcome record. Then find the queue where it started. You can do it, but you’re doing work the arrangement could have done for you.
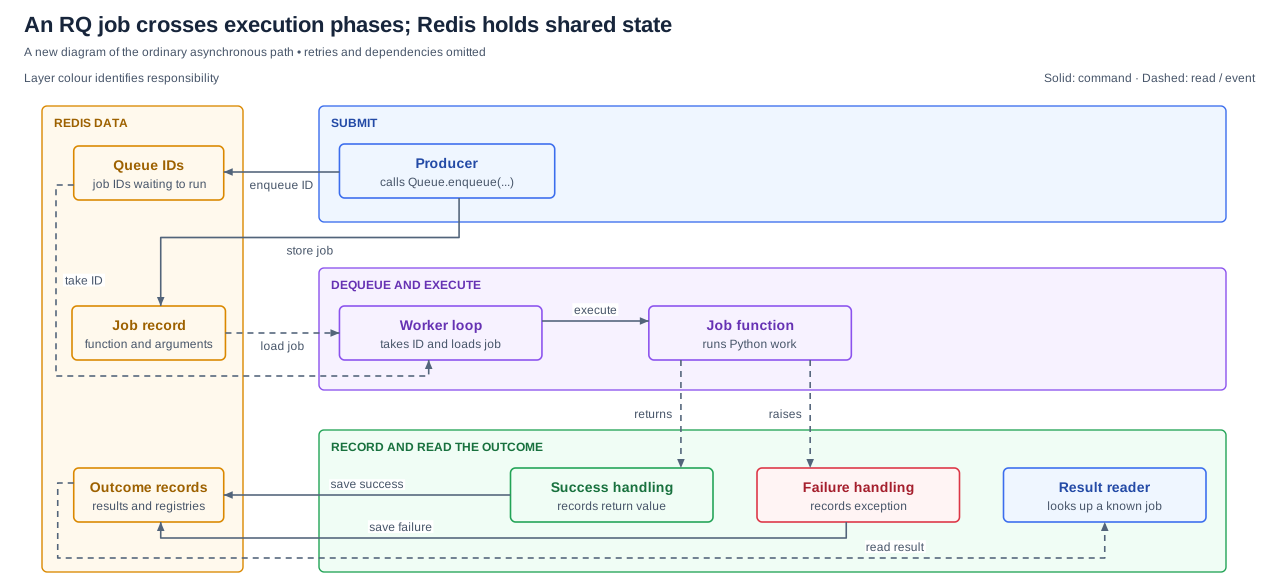
Here is the same flow drawn through my diagram skill:
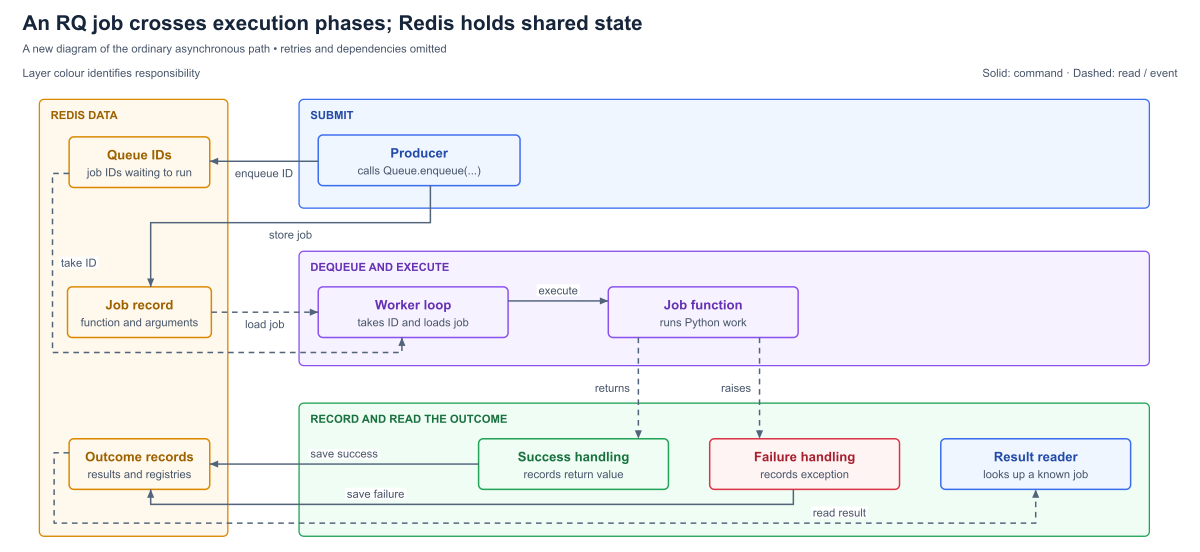
Now I can follow the job down the page and see both outcomes. The picture gives me somewhere to start.
You could spend time improving the Mermaid version too. I still use Mermaid, including later in this post. What I wanted was a way to make these decisions part of the agent’s normal workflow:
- Choose an arrangement that explains the question. A sequence of calls and a map of shared state need different pictures.
- Keep the facts intact during revisions. Moving a box must not quietly change its owner or remove an awkward connection.
- Make the drawing readable where it will appear. Labels need room, lines need space, and a document may shrink the image.
- Check the result before handing it back. “The renderer finished” says nothing about a line running through a label.
The skill gives the agent instructions for the first decisions and tools for constructing and checking the drawing. Let’s follow that handoff. The source bundle contains the files below, starting with SKILL.md.
The short version
- An agent that writes Mermaid gets every box and connection in, but not an arrangement another engineer can follow without help.
- The skill splits the work. The agent chooses the representation and writes a JSON model of the facts, with no coordinates. Python measures, places and routes it.
- The build validates the model first, so a misspelt endpoint stops it with an error instead of drawing an extra box.
- Every candidate drawing is audited from the finished SVG, for lines through text, detached endpoints and missing connections. Candidates are compared on an ordered score, so no shorter route outranks a violation.
- A separate checker and a human read come last, because geometry checks can’t say whether the picture answers the question.
Follow one request through the system
There are five participants worth keeping in mind. The agent reads the sources and writes a diagram model. build.py turns that model into drawings. It calls router.mjs to connect the boxes and audit.py to check the completed SVG. After the build returns, the agent calls cross_audit.py for a separate check and looks at the preview.
The build may try several arrangements of the same model. Each complete proposed drawing is a candidate, which it checks before deciding what to keep.
Here is the whole exchange before we open any of those files:
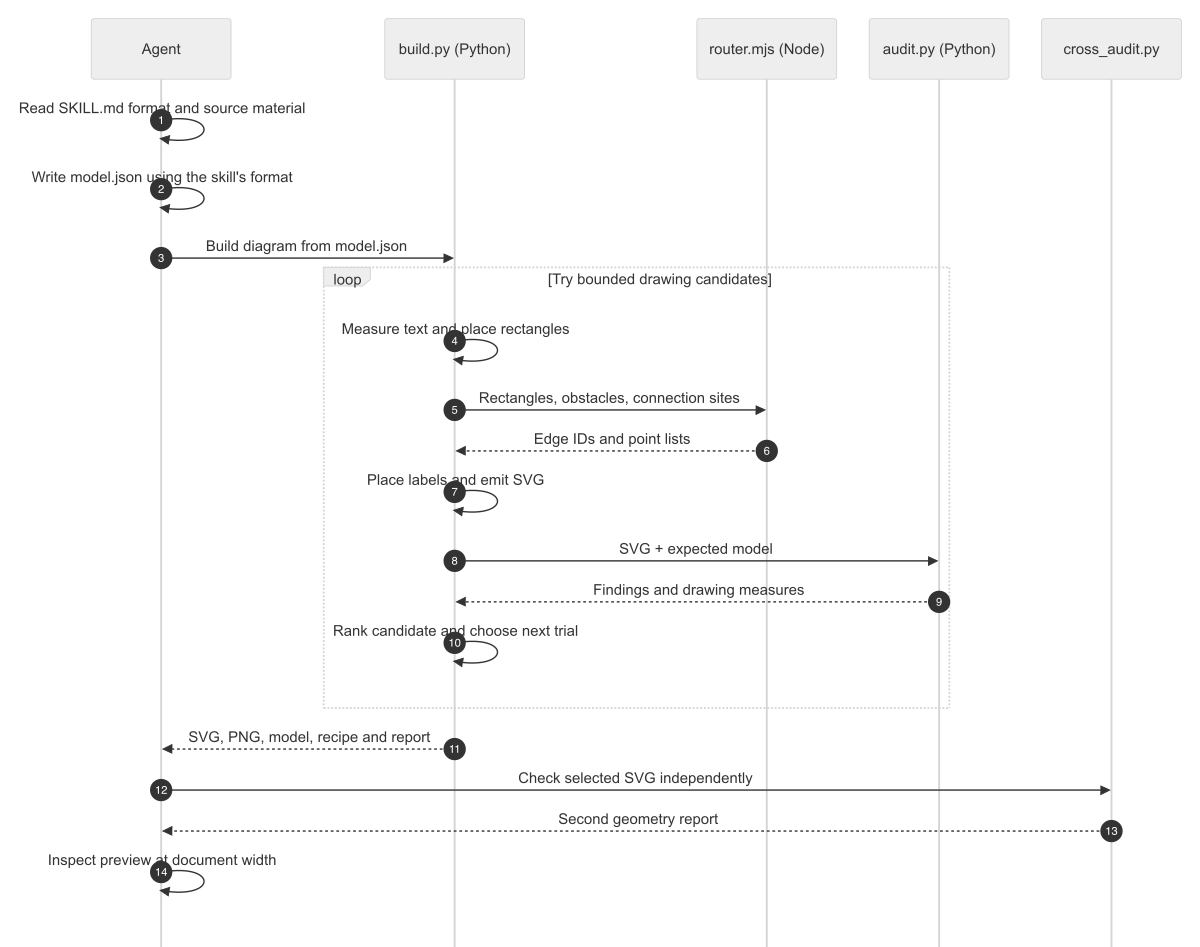
In that sequence, audit.py runs as a Python function inside the build process; the router runs in a Node subprocess. Here is the corresponding map of who calls whom:
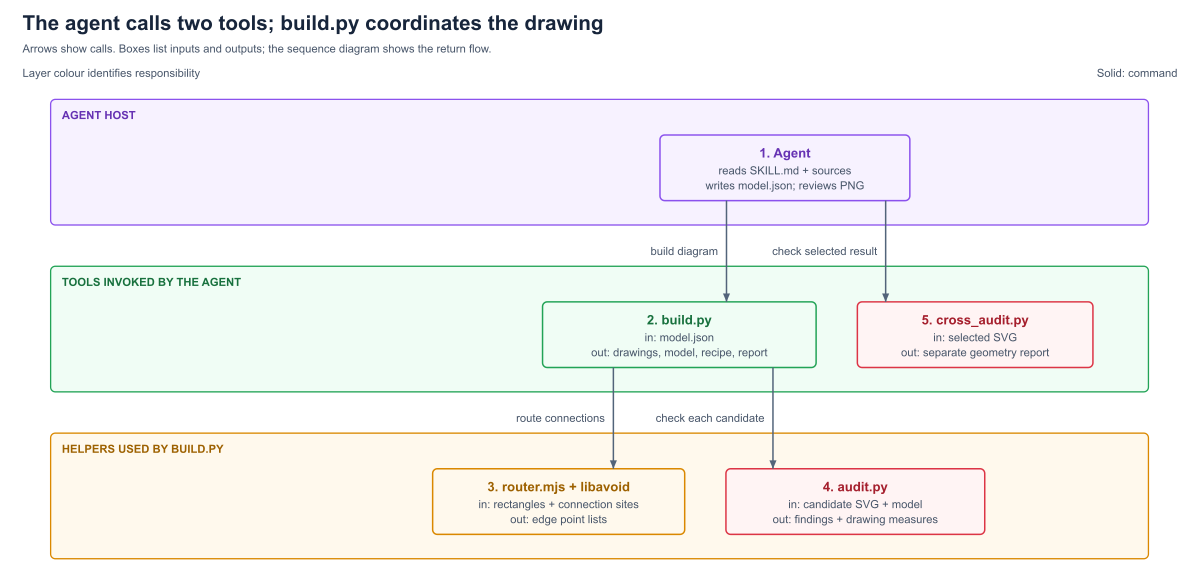
build.py uses layout.py and emit.py internally for placement and SVG generation. The sequence above shows how results come back.The distinction between the two sides is useful. The agent decides that Redis should remain visible across the job’s phases. Python decides where the rectangles and connecting lines go. If the first decision is wrong, a better route won’t repair it.
First, tell the agent how to choose the picture
A skill file is part of the context the agent reads before working. It can describe a procedure, provide a data format, and tell the agent which program to invoke. Nothing in the Python engine loads an LLM or interprets the original request.
So the first place to encode a drawing decision is the representation table in SKILL.md. Here are the entries relevant to this example:
| Question | Representation ||---|---|| What happens, in order, during one scenario? | Mermaid `sequenceDiagram` || How do components group into layers, and what crosses between them? | Structural JSON and this engine || Which shared actor or store participates across several phases? | Structural JSON with a spanning lane |For a question about the order of RQ calls, the first row would be enough. Here we’re also asking how shared data relates to the stages of a job. That brings us to the structural path.
Choosing that path still leaves the agent with a decision: which things become rows, and which things span them? The next instructions supply the rule:
- Use a `stage` for a horizontal row: a layer, phase, or alternative path.- Use a `spine` for a vertical lane whose actor or data spans several stages.- Put connectable components in `nodes`. Containers are not edge endpoints.- Give every node one owner with `parent`. Use `atStage` to align a spine's child with a row without giving it a second owner.Apply that to our job. Submission, execution, and outcome handling make three rows. Redis participates in all three, so its data goes in the spanning lane. The queue and job record belong to Redis; the worker belongs in the execution row.
Those choices explain the shape of Figure 2. The instructions don’t contain a hidden RQ-specific layout. They give the agent a way to translate the question and source material into an arrangement.
I want those choices visible enough to challenge. If we’re trying to explain a different property of the system, the agent should choose a different view.
Then give it a format it can actually write
“Produce a structured model” is incomplete guidance. The agent needs to know the field names, what they mean, and what a valid example looks like.
The next section of SKILL.md provides a field table and a complete small JSON example. For nodes and connections, the contract says:
| Record | Fields ||---|---|| `nodes[]` | `id`, `title`, `parent`, optional `lines`, `category`, `atStage` || `edges[]` | `id`, `from`, `to`, `label` (string or `null`), `kind` |Now the agent has something specific to imitate. In the full RQ model, the queue-to-worker relationship looks like this (other records are omitted):
{ "nodes": [ {"id": "queue", "title": "Queue IDs", "parent": "redis", "atStage": "submit"}, {"id": "worker", "title": "Worker loop", "parent": "run"} ], "edges": [ {"id": "dequeue", "from": "queue", "to": "worker", "label": "take ID", "kind": "read"} ]}parent records ownership. atStage puts the queue beside submission without making submission its owner. The read arrow follows the ID toward the worker; it doesn’t mean Redis initiated a function call.
The connection also has a name, dequeue. That ID will survive placement, routing, and SVG generation, so we can follow one relationship all the way through the system.
This is a format taught through instructions and examples. The engine has consistency checks, but it doesn’t enforce a complete JSON Schema; an unknown field can be ignored. That is why the field table matters. The agent should use the actual vocabulary instead of guessing that owner means the same thing as parent.
At the end of this step, the agent has written a file. It contains the explanation we want to draw, with no pixel coordinates yet.
Hand that file to Python
The build instructions tell the agent what to do next. For the bundled example, the command is:
python3 scripts/build.py examples/rq-job-path.json \ --out output/rq --crossings 3 --quickThat command runs from the source-bundle directory after the dependency setup. The agent can execute it with its shell tool just as we can from a terminal.
The first argument names the model. --out names the output directory. --crossings 3 sets the allowed crossing count, and --quick skips an expensive set of ordering permutations in the initial search.
Inside build.py, the command-line entry point reads the JSON into a Python dictionary called spec and passes it to build(...). That function coordinates the work in the middle of Figure 3.
It starts by trying an arrangement through layout(spec, config), in layout.py. Here config holds the drawing choices for one trial: spacing, ordering, and placement mode.
Before measuring anything, layout calls validate(spec). This is where ordinary code checks the model the agent wrote. For example, the endpoint check builds a set of connectable IDs and checks every edge against it:
endpoints = { n["id"] for key in ("nodes", "outcomes") for n in spec.get(key, [])}for e in spec["edges"]: if e["from"] not in endpoints or e["to"] not in endpoints: raise ValueError(f"Unknown endpoint in {e['id']}")If the agent writes workre instead of worker, the build stops with Unknown endpoint in dequeue. It doesn’t draw a plausible extra box or silently drop the connection.
Other checks catch duplicate IDs, invalid ownership, and containment cycles. These are checks on the file’s consistency. Whether the worker really reads the queue remains a question for the source material.
Measure the boxes, then connect them
Now we have a model we can arrange. The first geometric question is how much room its words need.
Still in layout.py, the loop over nodes measures each title and explanatory line. This excerpt sets the rectangle’s width and height:
n.update( role="node", w=max( 150, width(n["title"], TITLE_SIZE, True) + 28, max([width(s, BODY_SIZE) + 28 for s in n.get("lines", [])] or [0]), ), h=38 + 16 * len(n.get("lines", [])),)The width helper in typography.py measures the font. The rectangle must fit its title or widest body line, plus padding. Once the nodes have dimensions, the layout can make room for them inside their containers.
There is another size we need to check: the one the reader sees. A 2,000-pixel-wide SVG with 16-pixel labels becomes 9.6-pixel text when displayed at 1,200 pixels:
effective text size = 16 × 1200 / 2000 = 9.6 pixelsThat is approximately what happens to the labels in the first picture. The model’s targetWidth lets the engine check this scaling. Its 9.5-pixel floor is an early rejection threshold; I still need to judge whether the preview is comfortable to read in the actual document.
With rectangles placed, build.py calls routing_input(data, port_mode) to prepare the router’s input. data is the placed model. The result contains rectangles, obstacles, and possible connection sites on the sides of each box.
For our dequeue connection, the selected sites look like this:
{ "id": "dequeue", "source": { "node": "queue", "sites": [{"side": "W", "x": 0, "y": 0.7222}] }, "target": { "node": "worker", "sites": [{"side": "S", "x": 0.4407, "y": 1}] }}These are selected fields, with fractions rounded. W means the left side of the queue box, and S means the bottom of the worker box. The coordinates are fractions of those rectangles: x: 0 is the left edge, and y: 1 is the bottom edge.
This choice happens before the line is routed. Asking for the shortest route from the wrong side of a box can leave the router with a needlessly awkward path.
Python sends the request to router.mjs through the Node process’s standard input. The adapter uses libavoid, an existing connector-routing library, to find paths around the supplied obstacles. It returns JSON on standard output.
For dequeue, the returned points are:
(73.725, 185) → (56, 185) → (56, 376) → (428.699, 376) → (428.699, 360)Read that as left out of the queue, down beside the job record, right beneath the worker, and up into it. We started with “the worker takes an ID.” Now that same connection has a route.
A finished drawing gives us something to reject
A returned route is only part of the image. We still need container boundaries, labels, and an SVG.
Back in build.py, the coordinator attaches each returned point list to the matching edge ID. Then it finishes and checks the drawing:
routes = {r["id"]: r["points"] for r in output["routes"]}for e in data["edges"]: e["points"] = routes[e["id"]]
fit_boundaries(data)place_labels(data)render(data, svg)report = audit(svg, spec, max_crossings=max_crossings)Here output is the router response, data is the placed model, and svg is the candidate file. fit_boundaries adjusts container borders around the routed traffic while preserving the returned paths. The label placement and rendering functions live in emit.py. The audit function, in audit.py, reads what was actually emitted.
That order matters. Checking the router’s points before labels are added would miss a collision introduced during labeling.
One of the RQ candidates shows why I want this check:
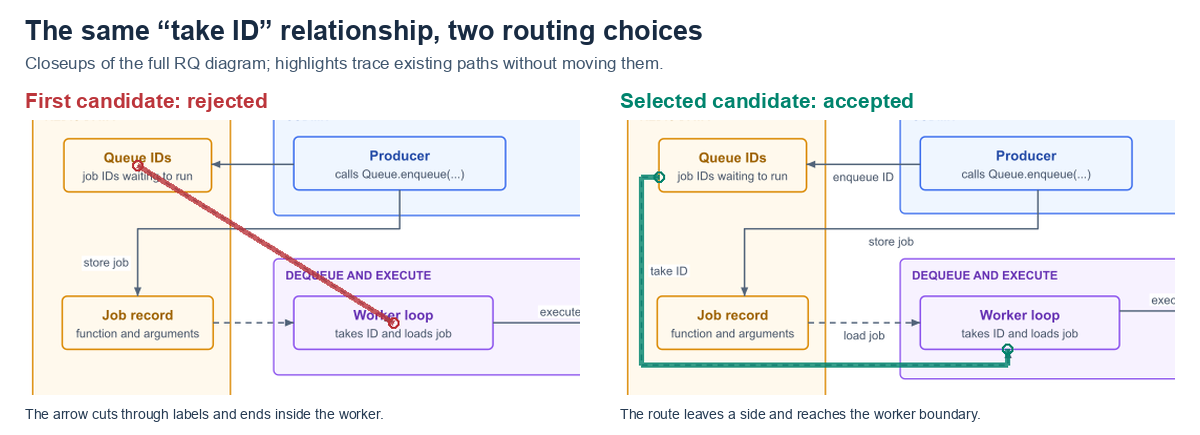
The initial connection runs between node interiors and through text. The selected route uses the left and bottom attachment sites we just followed. Requesting orthogonal routing hadn’t been enough; the returned drawing still needed inspection.
For this route, one failure is straightforward: its endpoint sits inside the worker instead of on the box’s boundary. The auditor reads the points back from the SVG and checks where the line actually ends:
for end, nid in ((pts[0], e.get("data-from")), (pts[-1], e.get("data-to"))): if nid not in rects or min( point_segment(end, a, b) for a, b in walls(rects[nid]) ) > .1: fail("detached-endpoint", eid, nid)pts holds the line’s points, and rects holds the node rectangles parsed from the SVG. The loop checks both ends against their named nodes. point_segment measures the distance to each side of the box; an endpoint more than 0.1 drawing units from every side fails. An endpoint in the middle of a box therefore fails even though the line appears to reach the right component.
The report records the connection and node IDs with detached-endpoint. That gives the build something specific to compare on the next attempt. Other checks cover lines through text, overlapping strokes, missing connections, and clearance. They all ask questions about the completed drawing instead of trusting the request we sent to the router.
How the build chooses another drawing
Finding a bad candidate tells us to try again. It doesn’t tell us which alternative to keep.
The build can try different spacing, legal sibling orderings, and attachment sides. It needs a way to compare the resulting audit reports, so build.py gives each candidate a score.
I use that word for an ordered list of criteria, not a single quality percentage. Reported violations come first. Crossings come before preferences for straight lines and fewer bends. Only when those are tied do wire length and drawing height matter.
The score(report, data, max_crossings) function returns this tuple:
return ( len(issues), max(0, report["crossingCount"] - max_crossings), report["crossingCount"], -report["straightEdges"], report["totalBends"], report["maxBends"], round(wire_length), round(data["H"]),)issues excludes the crossing-budget finding, which the next entry handles separately. Python compares tuples from left to right. That means a shorter route cannot buy its way past a worse violation count.
You can see the tradeoff in the two RQ candidates:
| Candidate | Native findings | Crossings | Straight connections |
|---|---|---|---|
| Initial, rejected | 13 | 2 | 7 |
| Selected | 0 | 0 | 6 |
The selected drawing has fewer straight connections. That is fine: the extra straight line in the first drawing wasn’t worth missing labels and detached endpoints. The findings include related symptoms, so this isn’t a count of thirteen separate bugs.
The retry instructions in SKILL.md protect the model while this happens:
- Keep required components, connections, ownership, and declared order.- Do not hand-edit SVG coordinates or remove a relationship to pass.- If required checks still fail, retain the rejected output and explain the unresolved problem. Do not label it accepted.The search has a limit. It can exhaust its alternatives without finding an acceptable drawing. The right response is a visible failure or a discussed change to the diagram’s scope, not a cleaner picture with a missing relationship.
Bring the result back to the agent
When the build returns, the agent has an SVG, PNG previews, the model, a report, and a recipe recording the selected drawing choices. The recipe lets us replay those choices instead of searching again.
The agent then runs the separate checker:
python3 scripts/cross_audit.py --strict --max-crossings 3 \ output/rq/rq-job-path.svgcross_audit.py implements its geometry checks separately from the build’s auditor. They have overlapping coverage, with different details, so a disagreement needs investigation. A second report is another source of evidence, not a vote that overrules a failed check.
Finally, the instructions return to the original question:
Open the PNG at its intended display width. Follow the main path through it.Check labels, apparent ownership, reading order, and whether the explanationstill agrees with the source. Read both audit reports.For our report job, can I find where work enters, follow execution, and understand both outcomes? Does the Redis lane say what I intended? Geometry checks help, but those remain reading questions.
The bundle’s README contains setup and run commands. It also includes the RQ model and replay recipe behind the full-size result. Replaying that model and recipe from a separate copy of the bundle reproduced the article’s SVG.
What I’d inspect when the next diagram looks wrong
There is now a useful place to start:
| What looks wrong | Where I’d look first |
|---|---|
| The picture tells the wrong story | The question, source material, and model JSON |
| A component belongs in the wrong group | The agent’s stage / spine / parent choices |
| Labels become tiny in the document | Text measurement, canvas size, and targetWidth |
| A connection takes an awkward path | Placement and connection sites, then the router |
| A bad drawing is being accepted | The emitted SVG, audit findings, and ranking criteria |
That is the payoff for separating these responsibilities. I can correct the explanation without nudging coordinates, and improve the drawing without granting permission to rewrite the architecture.
To use the bundle on your own code, start with one question you want the picture to answer. Let the agent read the skill and sources, then review the model it writes. Once that says the right thing, the engine has a concrete job: make those relationships readable and show its work.
Related posts

Handing off between agents
A handoff carries two things: the words the next model reads, and the state the next runtime has to enforce. Every common handoff style moves only the words. In a small scripted demo, even the full transcript, 1,838 bytes, left the restaurant holding two tables, because the key that names the in-doubt booking was never in it. A 310-byte record written by the sending runtime fixed it.
AI & agentic architecturesai-agentsreliabilityarchitecture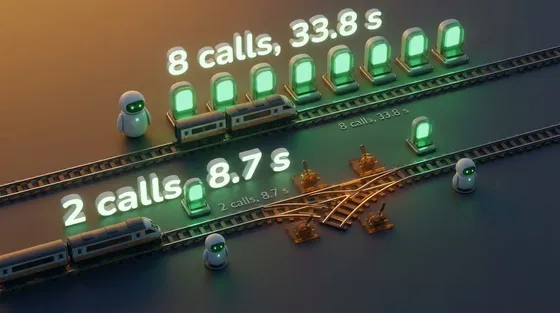
What a state machine buys an agent
The same dinner booking, sent to Claude as a free-form tool loop and as a state machine. Per-state tool lists sent 61% fewer tokens, but with prompt caching on they cost 23% more on input, and with output counted the two came out about even. The real saving was code running the steps that need no model, 8 calls down to 2 and about 72% off the total, plus a table of every state against every event.
AI & agentic architecturesai-agentsprompt-engineeringarchitecture
The agent event bus
When one agent calls another with a sentence, the caller's model writes the callee's prompt, and a stranger's note can ride along. In a small scripted demo a bus seemed to fix that, but a typed fact sent by call was just as safe, and a bus event with a note was not. What the bus adds is that one agent being down doesn't leave another's work half done.
AI & agentic architecturesai-agentsarchitecturedistributed-systems
 AI
Handing off between agents
A handoff carries two things: the words the next model reads, and the state the next runtime has to enforce. Every common handoff style moves only the words. In a small scripted demo, even the full transcript, 1,838 bytes, left the restaurant holding two tables, because the key that names the in-doubt booking was never in it. A 310-byte record written by the sending runtime fixed it.
ai-agentsreliabilitySep 2026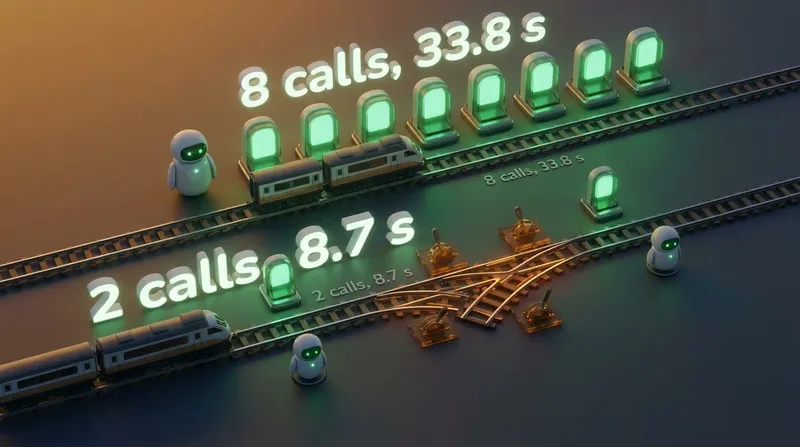 AI
What a state machine buys an agent
The same dinner booking, sent to Claude as a free-form tool loop and as a state machine. Per-state tool lists sent 61% fewer tokens, but with prompt caching on they cost 23% more on input, and with output counted the two came out about even. The real saving was code running the steps that need no model, 8 calls down to 2 and about 72% off the total, plus a table of every state against every event.
ai-agentsprompt-engineeringOct 2026 AI
The agent event bus
When one agent calls another with a sentence, the caller's model writes the callee's prompt, and a stranger's note can ride along. In a small scripted demo a bus seemed to fix that, but a typed fact sent by call was just as safe, and a bus event with a note was not. What the bus adds is that one agent being down doesn't leave another's work half done.
ai-agentsarchitectureSep 2026
Comments